


So… you’ve decided to build your online store with WordPress. Nice choice!
Let me walk you through the whole process.
Before we jump into the actual WooCommerce website design, there are a few things you’ll need to get first. Think of these as the essentials. Once you’ve got them, we can move on to building your store.
What do you need?
Hosting, a domain name, a theme, the right plugins
“But… what are these, and why do we even need them?”
Hang in there… I’ll explain everything.
Hosting
If you want your website to stay online 24/7 so customers can visit it anytime, from anywhere in the world, your website needs a place to live.
That’s exactly what hosting is.
In simple words, hosting is basically a computer that’s always turned on. It’s kept in a professional data center with fast internet, proper cooling, backup power, and everything needed to keep your website running all the time.
If that computer goes offline, your website goes offline too. That’s what people mean when they say a website is down.
That’s why choosing the right hosting is one of the most important steps in WooCommerce website design.
Think of it this way…
If you’re opening a physical store, the first thing you need is the land or the building.
No land…
No shop.
Your hosting works exactly the same way.
Of course, where you buy your hosting matters too.
If you’ve already looked at a few hosting companies, chances are you ended up even more confused than when you started.
There are just too many plans, too many features, and everyone claims they’re the best.
Personally, I’d recommend Hostinger Premium Hosting.
But if you decide to buy hosting somewhere else, make sure they let you configure everything manually.
For a brand-new website, here’s what I’d recommend:
Shared WordPress Hosting, 2 GB Storage, cPanel (DirectAdmin works too), 2 GB RAM, 2 CPU Cores
Honestly…
That’s more than enough to get started.
Wait… weren’t you going to explain hosting?
Fair point.
There are different types of hosting.
The two you’ll hear about most often are Shared Hosting and Dedicated Hosting.
Dedicated hosting means you’re renting an entire server just for yourself.
Sounds great, right?
Well… not really.
At least not when you’re just getting started.
Yes, it’s faster.
Yes, you get more resources.
But it’s mainly designed for large businesses with huge amounts of traffic.
If your online store is brand new, buying dedicated hosting is simply wasting money.
Instead, go with shared hosting.
You’ll basically rent a small part of a powerful server, and that’s more than enough for a new WooCommerce website design.
The same goes for storage.
If your website is new, it won’t have thousands of products or files yet.
That’s why 2 GB is perfectly fine.
Later on, if your business grows, you can always upgrade your hosting plan in just a few clicks.
Now, let’s talk about cPanel and DirectAdmin.
These are simply hosting control panels.
They help you manage your website files, folders, databases, emails, and pretty much everything else related to your hosting.
Both are good.
I personally prefer cPanel because it’s a little easier to use.
Plus, all of my tutorials are based on cPanel.
(If you buy hosting from Hostinger, you’ll notice they use something called hPanel instead. Don’t worry—it looks a little different, but almost all the options are in the same place, so you’ll have no problem following along.)
Domain Name
So…
What’s a domain name?
It’s simply your website’s address.
It’s the thing people type into their browser to visit your site.
Think of it like the address of your physical shop.
If your shop doesn’t have an address…
How are customers supposed to find you?
A domain name usually consists of your business name plus an extension like:
.com
.net
.org
.ir
Choose the one that fits your business.
If I were you, I’d buy my domain from Namecheap.
Choosing the Right Theme
Now let’s talk about themes.
Simply put, a theme is a collection of files and code that controls how your website looks. It gives your site its design, layout, and in many cases, extra features too.
Themes generally come in two versions:
Free
Premium (Paid)
Free themes aren’t necessarily bad, but they usually come with fewer customization options and limited features.
That’s why I almost always recommend going with a premium theme.
There are plenty of great premium themes out there.
Some of the most popular ones are:
WoodMart
Flatsome
Impreza
Each one is designed with different types of websites in mind.
But since we’re building an online store, my recommendation is WoodMart.
Honestly, it has almost everything you’ll need for a professional WooCommerce website design, and it’s the theme I’ll be using throughout these tutorials.
So let’s keep things simple and stick with that.
Plugins
Now, plugins…
Think of plugins as little add-ons that give your website new superpowers.
Need a new feature?
There’s probably a plugin for it.
For example…
If we want to create custom product tabs like these…
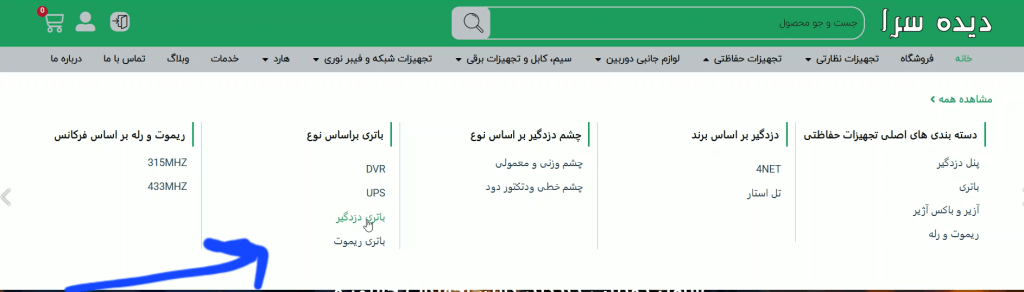
We’ll use JetTabs.
Want advanced product filters so customers can easily find what they’re looking for?
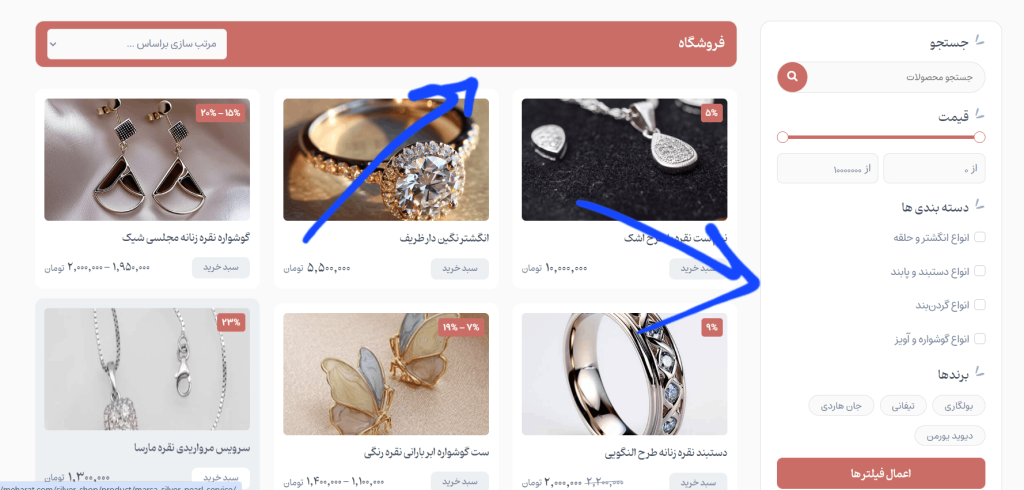
We’ll use Smart Filters.
Need help optimizing your website for Google?
Rank Math is one of my favorite SEO plugins.
Every website is different.
Depending on how you want your store to look and what features you need, you’ll probably end up using different plugins.
Don’t worry though.
In future articles I’ll introduce every plugin we use, explain why we need it, and show you exactly how to install and use it.
So let’s leave that for later.
Quick question…
Have you already bought your hosting and domain?
If the answer is yes…
Awesome.
Let’s move on to the fun part.
Installing WordPress on Your Hosting
Alright…
Now we’re finally at the first real step of building your online store.
Installing WordPress.
More specifically…
The first thing we need to do is create a database.
Creating Your Database
Log into your cPanel.
Not sure how?
Go back to the company where you bought your hosting.
Inside your hosting account, you’ll usually find:
Your cPanel login link
Your username
Your password
Make sure you save these somewhere safe.
Trust me…
You’ll need them again later.
Once you’re inside cPanel, head over to Databases and click on Database Wizard.
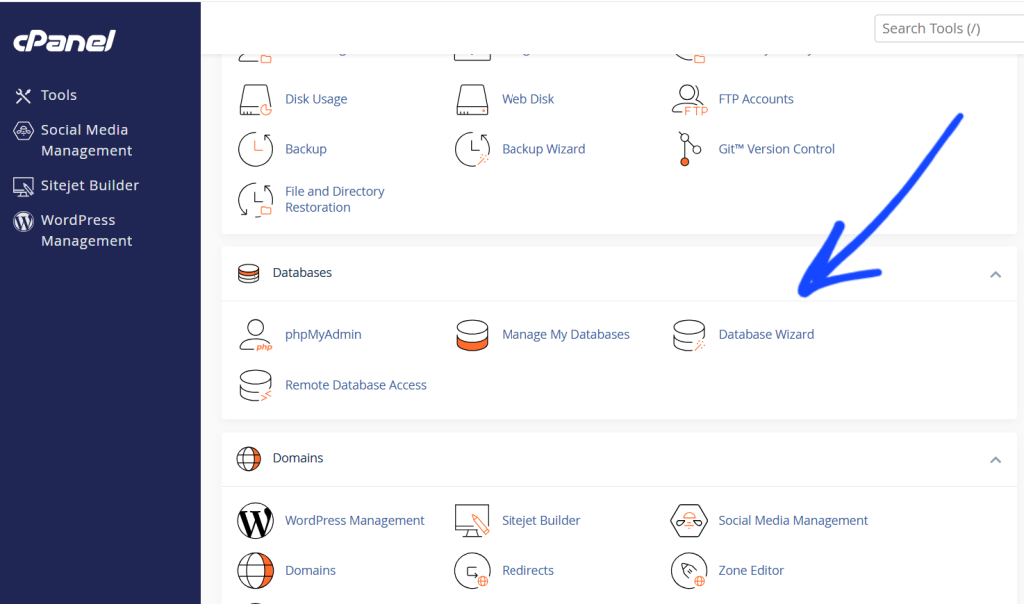
Now create a new database.
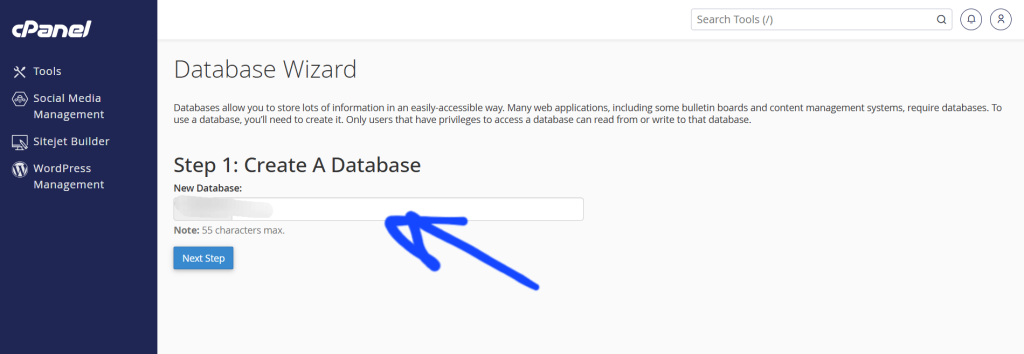
Choose a database name using English letters.
It can be anything you want, but I usually recommend using something related to your website’s name.
Next, create a strong password.
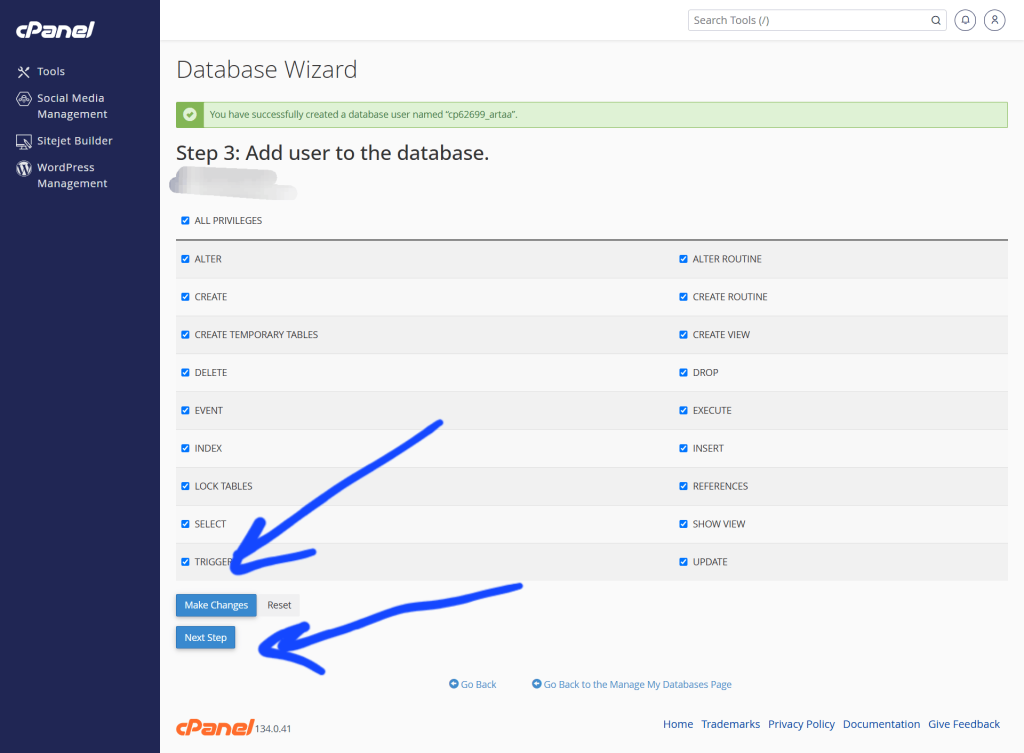
And this part is important…
Seriously…
Save your database name and password in a text file.
Don’t rely on your memory.
You’ll need these details during the WordPress installation.
Once you’ve finished following the steps on the screen…
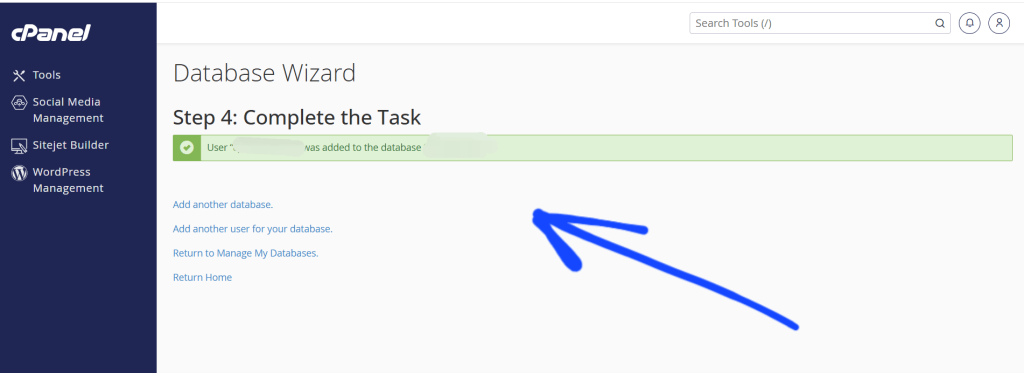
Congratulations!
Your database is ready.
Uploading WordPress
Time for the next step.
Go back to cPanel.
This time, open File Manager from the Files section.
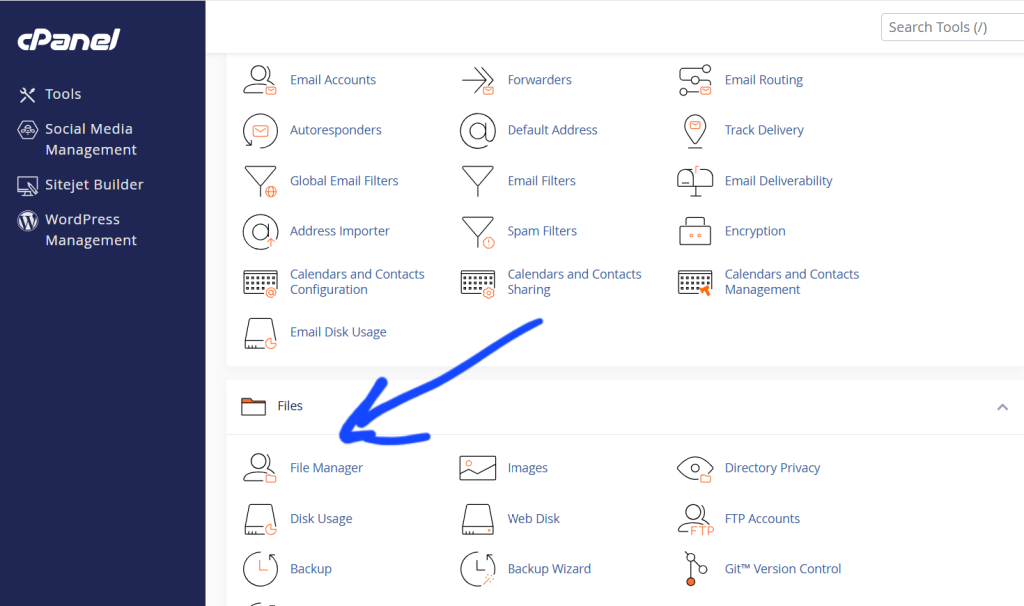
Then open the public_html folder.
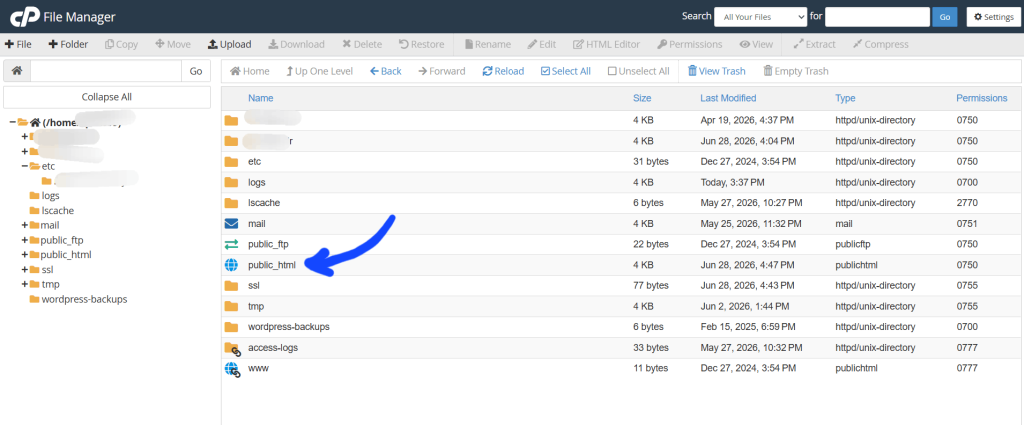
Now upload the WordPress ZIP file that you downloaded earlier from here.
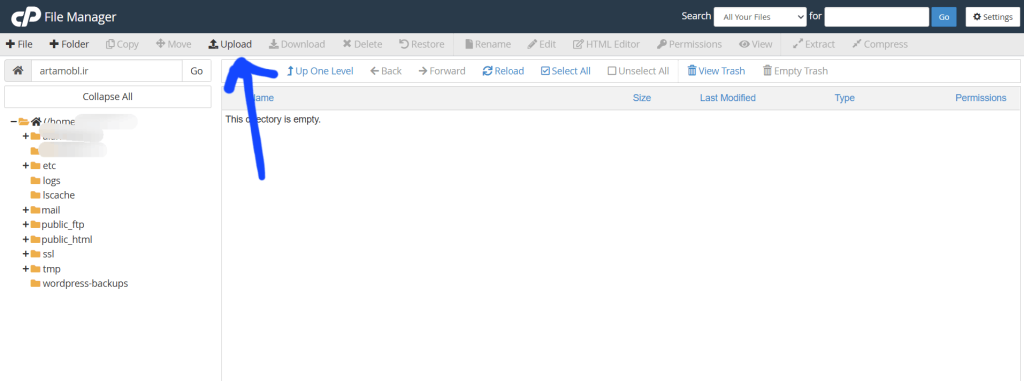
Once the upload finishes…
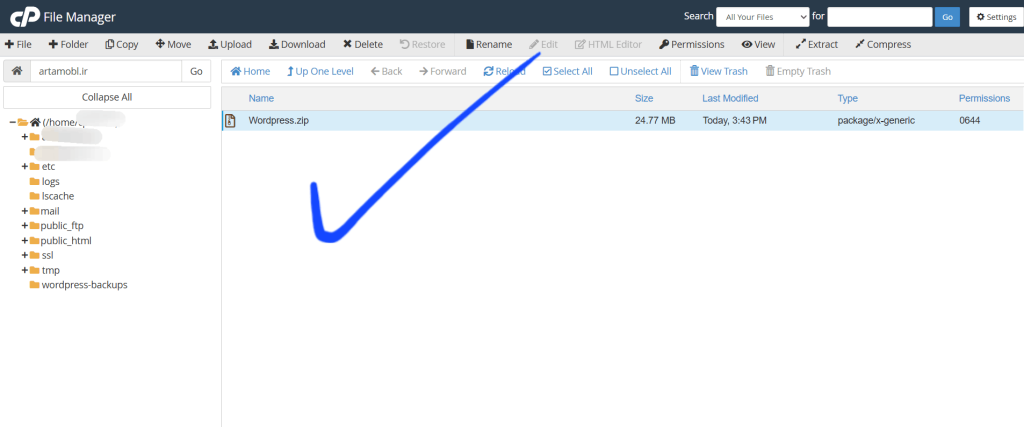
Extract the ZIP file…
And then delete the original ZIP archive.
No reason to keep it anymore.
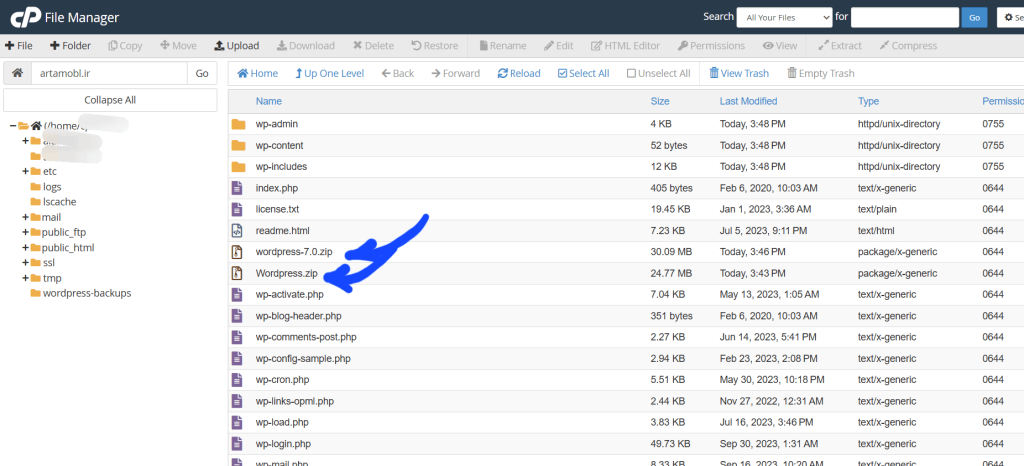
Activating WordPress
Now comes the exciting part.
Open your browser and type in your domain name/duplicator.
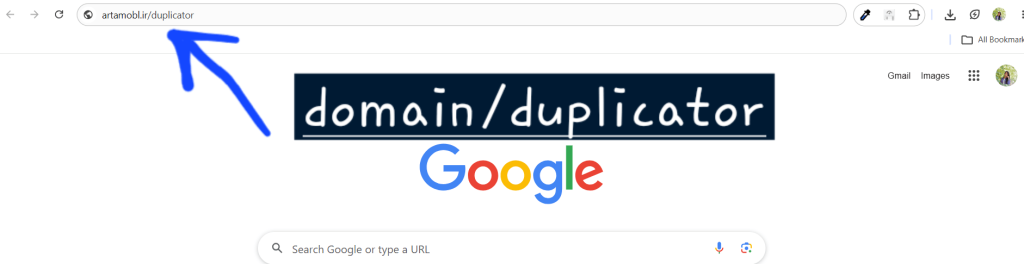
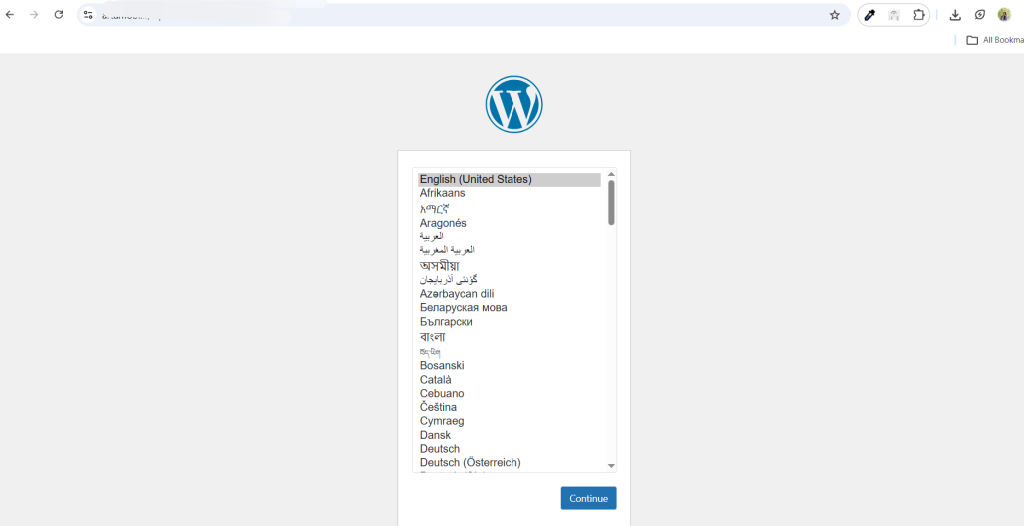
You’ll see the WordPress installation screen.
Choose the language you want to use.
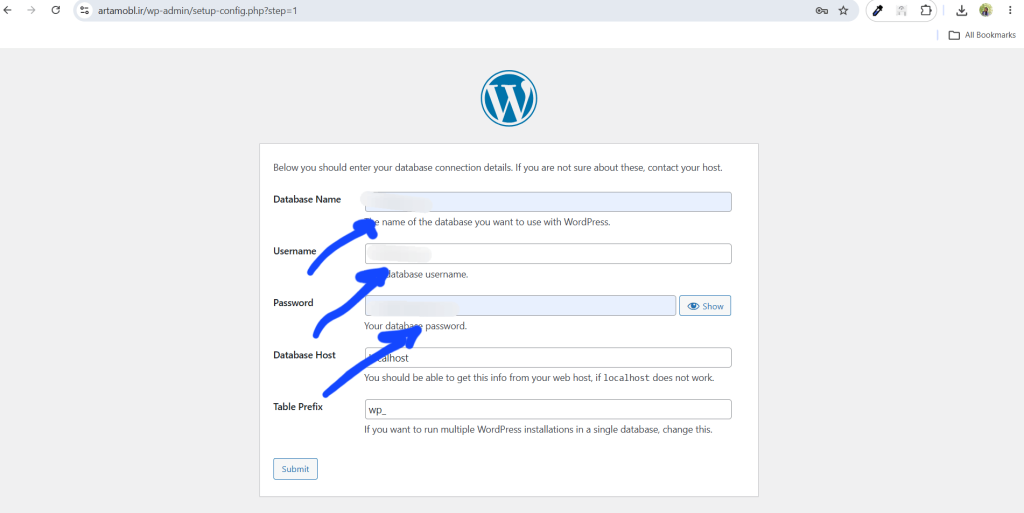
On the next page…
Remember those database details I told you to save?
Yep…
This is exactly why.
Enter your database name, username, and password.
You can leave the last two fields exactly as they are.
No need to touch them.
Click Submit, follow the remaining installation steps, and that’s it.
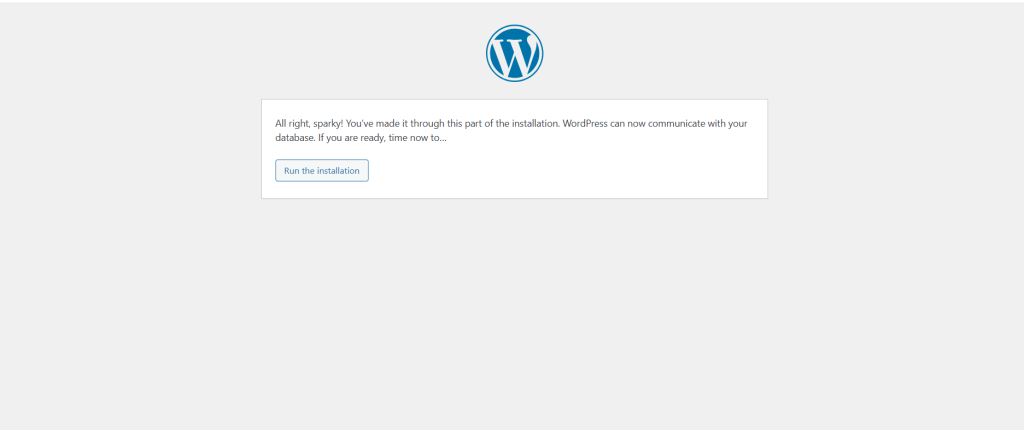
WordPress is officially installed.
One more thing before we move on…
Don’t forget to save:
Your WordPress admin username
Your password
Your email address
Your login URL
Trust me…
You don’t want to search for those every single time you want to log in.
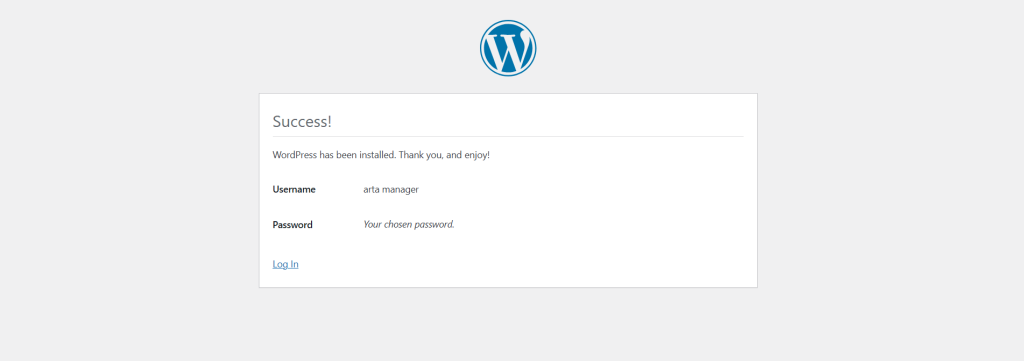
Congratulations!
Your website is officially live.
But…
It’s still just a website.
Now we need to turn it into a professional WooCommerce website design.
Before We Start Designing…
Hold on for just a second.
Let me explain something that confuses almost everyone who’s new to WordPress.
Every website has two different sides.
The first one is the part your visitors see.
That’s your actual website.
The second one is your Dashboard.
This is where you manage everything—your products, pages, blog posts, orders, settings… basically the entire website.
Only you (or anyone you give access to) can see this area.
So from now on, you’ll be switching between these two pages quite a lot.
I’d recommend bookmarking both of them.
Your website’s homepage…
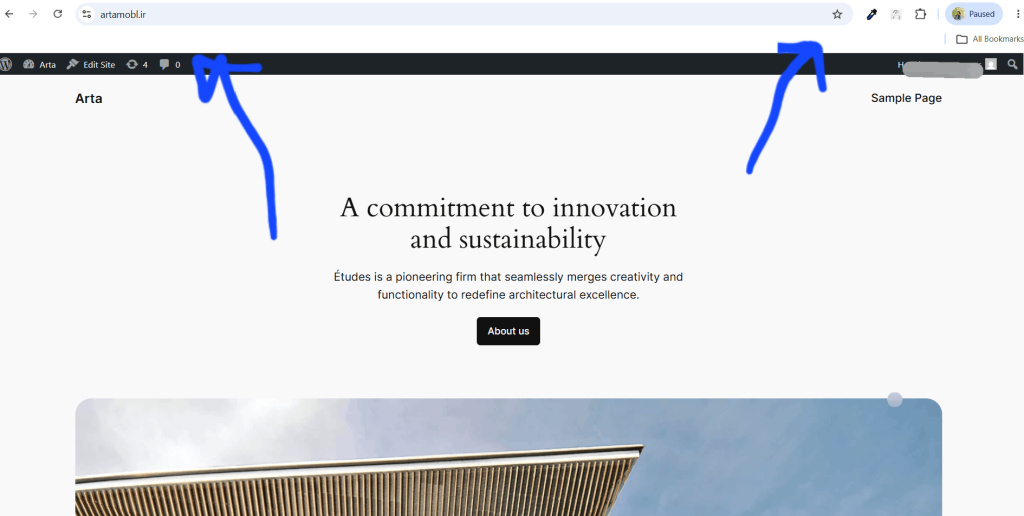
And your WordPress Dashboard login page.
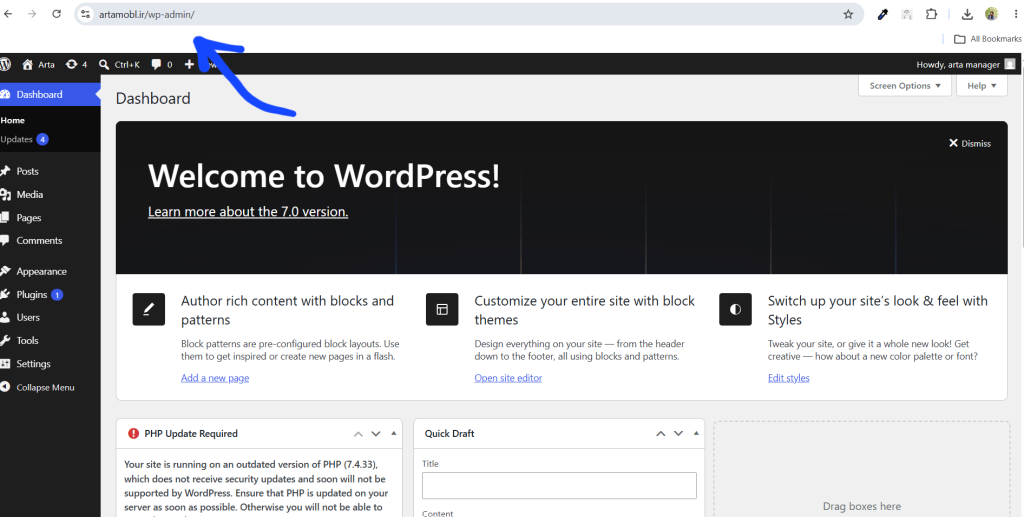
It’ll save you a lot of time later.
Installing Your Theme
You’ve made it this far…
Let’s take one more step.
It’s time to install your website theme.
Inside your WordPress Dashboard, go to:
Appearance → Themes → Add New → Upload Theme
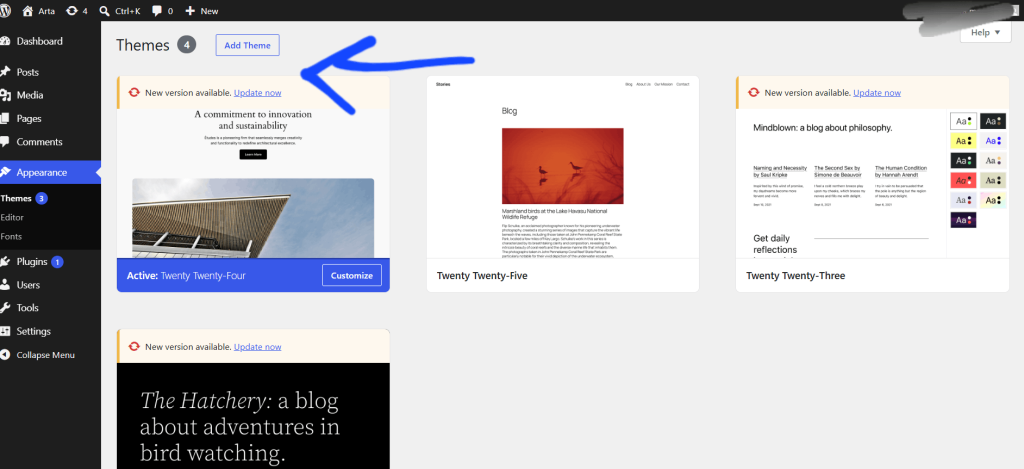
Select the theme file…
Upload it…
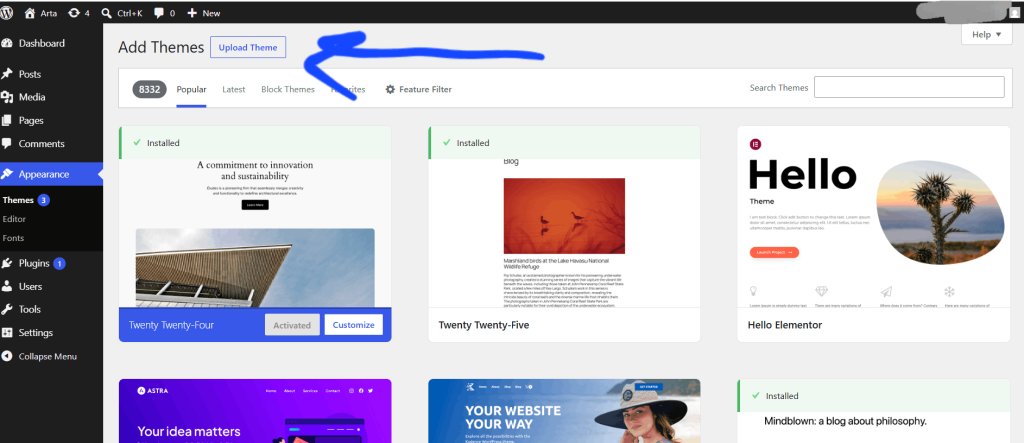
Activate it…
Done.
That’s literally it.
Installing Plugins
Installing plugins is just as easy.
Go to:
Plugins → Add New → Upload Plugin
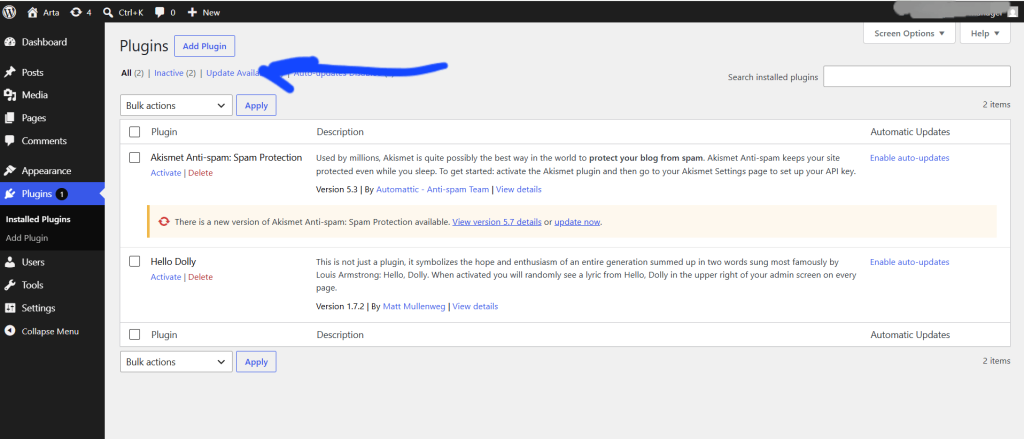
Choose your plugin ZIP file…
Upload it…
Click Activate…
And you’re done.
That’s exactly how you’ll install almost every premium plugin in WordPress.
Simple enough, right?
What’s Next?
At this point…
You officially have a working website.
Nice!
But it’s still just the foundation.
The real WooCommerce website design starts now.
Over the next tutorials we’ll build your online store step by step.
We’ll customize the design…
Create product pages…
Set up WooCommerce…
Optimize your website…
And make it look like a professional eCommerce store.
So don’t worry if your website still looks a little plain.
That’s completely normal.
We’re getting there.
Don’t Feel Like Doing All This Yourself?
Let’s be honest…
Not everyone enjoys dealing with hosting, WordPress, themes, plugins, and all the technical stuff.
If you’d rather skip the headaches and have your online store built professionally without spending a fortune…
Feel free to get in touch with us.
We’ll take care of everything—from WooCommerce website design and development to SEO optimization—so you can focus on growing your business.
But…
If you’re the kind of person who likes learning new skills and building things yourself…
Keep reading.
The next tutorials will walk you through every step of designing your WooCommerce store from scratch.
Let’s build it together.